Final
Inspection. In
order to get approval from the town, we needed to pass Building,
Fire, Electrical and Plumbing (Boiler). Throughout this process,
I have had no luck and an absolute lack of respect from the
inspectors. It was so annoying. So it came to be that I insisted
that my father (who happens to be the architect) needed to
be present during the inspections. Sure enough, there was
more respect in the room and I started to get the passing
stickers. Building passed with flying colors (she didn’t
even look under the stairs). The fire inspector saw the boiler
was ship shape and test the smoke/CO alarms (I had to get
Wren out of the house for that one). Passed.
Electrical passed after I installed a shut off outside the
hot tub. Makes perfect sense, but the interesting thing was
he saw this connection months ago and said nothing.
Plumbing had a little issue with the ventilation of the boiler
room. Lots of burning, no air, so to speak. So I piped the
air intake of the water heater directly to the outside using
the old dryer vent, taking it out of the equation. Then cut
away a bottom piece of the door and installed a grill in order
to create a convection current (the top is a louver). After
that, passed.
January 18th, 2007. Almost a year after we
bought the house, we officially (according to the town, anyway)
finished construction. We got the Certificate of Approval.
There were a couple more things I need to do, though.
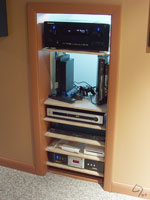 The second the building
inspector passed us I started working on the server room.
First up was building the component stand. For a while I
was thinking of using some parts from a metal pro stand that
I got from a friend, but then I found out it was too expensive
to get new shelves...so I built it myself out of wood. I
had some plywood left over in the garage and I went to the
Ikea lumber yard where I got predrilled wood for $5 a piece.
These are the same legs that are from the shelves in the
work shop. A couple of L-brackets from Home Depot and I was
set. I even stapled some Elfa shelf liners to the top of
the plywood. It should have fit perfectly, but thanks to
the wonderful contractor I had, the opening wasn’t
square. So I had to chip away a little on the inside to make
it fit. There are 6 shelves, which technically are adjustable,
but I doubt I ever will adjust them. The second the building
inspector passed us I started working on the server room.
First up was building the component stand. For a while I
was thinking of using some parts from a metal pro stand that
I got from a friend, but then I found out it was too expensive
to get new shelves...so I built it myself out of wood. I
had some plywood left over in the garage and I went to the
Ikea lumber yard where I got predrilled wood for $5 a piece.
These are the same legs that are from the shelves in the
work shop. A couple of L-brackets from Home Depot and I was
set. I even stapled some Elfa shelf liners to the top of
the plywood. It should have fit perfectly, but thanks to
the wonderful contractor I had, the opening wasn’t
square. So I had to chip away a little on the inside to make
it fit. There are 6 shelves, which technically are adjustable,
but I doubt I ever will adjust them.
 The original plan
was I would also make a door there and I left the wood unfinished
because of that, but after I added trim around it I didn’t think it needed it. It looked
fine. Maybe one day, I’ll add a door. The original plan
was I would also make a door there and I left the wood unfinished
because of that, but after I added trim around it I didn’t think it needed it. It looked
fine. Maybe one day, I’ll add a door.
 I also needed a
couple of shelves in the server room and I had the perfect
ones. We had some white Elfa shelves left over from the apartment
that we couldn’t use anywhere else
(the rest of the house uses the platinum color). They fit perfectly. I also needed a
couple of shelves in the server room and I had the perfect
ones. We had some white Elfa shelves left over from the apartment
that we couldn’t use anywhere else
(the rest of the house uses the platinum color). They fit perfectly.
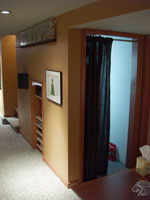
When I looked at
the temporary curtain in front of the server room I actually
liked it. That, and as it turned out, a custom louver door
of that size wasn’t cheap. So I got a door
frame, you know, the same one the doors had but without the
door, installed and trimmed it and now it really was finished.
Now to do the thing that has been plaguing me for months -
the master bedroom window frames/trim.
The thing about
this is it was never supposed to be redone, but when the
demo guys tore apart the rooms, they destroyed the frames,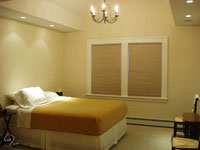 even thought they knew we weren't replacing the windows.
I could have done them a long time ago, but I kept pushing
them off because it wasn't something that needed to be done
in order for something else the done (like inspection), and,
as you’ve probably figured out, there was a lot
of that. I had a couple days off plus the weekend at the end
of the month which I devoted to finished up this lingering
thing. It wasn’t that easy. In following the same style
as the rest of the floor, the frames were made up of 5 pieces.
It took 2 days to build and 2 days to paint. After that one
of the first things we ever bought for the house, the blackout
blinds, were put up. even thought they knew we weren't replacing the windows.
I could have done them a long time ago, but I kept pushing
them off because it wasn't something that needed to be done
in order for something else the done (like inspection), and,
as you’ve probably figured out, there was a lot
of that. I had a couple days off plus the weekend at the end
of the month which I devoted to finished up this lingering
thing. It wasn’t that easy. In following the same style
as the rest of the floor, the frames were made up of 5 pieces.
It took 2 days to build and 2 days to paint. After that one
of the first things we ever bought for the house, the blackout
blinds, were put up.
Then finally, the absolute last thing I needed to build was
done (keyword: needed). It was a small drawer cabinet in the
master bath. Since the tub is 6 feet and the room is 7 feet,
we put in a seat with the same stone top as the counter and
underneath I made a small drawer for extra storage. I had the
wood and stain for a long time, but this was clearly low on
my priorities, but it was significant none the less because
it was the last thing that I had to make.
And we are done.
Just as in any house, there’s always
something else. I considered this the completion of the original
plan that we started when we first laid eyes on this house.
Once again, done.
The Future. The
something else. It starts today, as they say. Literally.
As I write this, we had some landscapers clean up the side
and the front of the house. Not just for aesthetics. You
see the container was parked there during the construction
and not only did they destroy the front yard, but all these
little bits of crap were lying around that we just couldn’t
get rid of. So they fixed it up nice. I just have to keep
watering the lawn so the grass can grow.
Next up
is doing something with the sun room. There’s
a glass ceiling in there so like a greenhouse, it gets REALLY
hot in there. We decided it would be worth it to have some
people come in and put some UV filtering film on the windows
to help keep it cool. The filters also help keep the heat
in during the winter as well. Put some blinds in and move
the couch in there and we can start enjoying the room with
Wren. She has to share.
The other interior
thing I’d like to tackle is the attic.
A lot of the floor boards are open, so if I cover them up I
can make it more useable for storage. Condition it (it’s
already insulated) and it’s a useable room.
Further in the future
we need to fix the retaining wall for the exterior stairwell.
This requires us to dig up the front (not where the landscapers
were) and rebuild the wall. We also want to landscape the
backyard, but we’re not in a hurry
for that one. I think we’ll rest a bit first and enjoy
the house.
Still want more?
See the original and final pictures, click the right arrow.
 
prev |1|2|3|4|5|6|7|8|9|
Back
to the News page |