December. 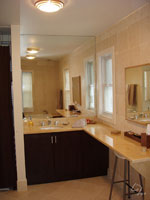 Back
up on the second floor, we still needed a mirror in the master
bath. We wanted a custom mirror to cover the entire wall above
the sink. More specifically, we needed one because it required
cutting a hole out for an outlet on that wall. When I mentioned
that to a couple of companies, they just gave me excuses saying
it was very expensive and it could take a while to do. Finally
we found a place that didn’t complain and they did an
excellent job. They even supplied a mirrored plate cover without
me asking about it. Back
up on the second floor, we still needed a mirror in the master
bath. We wanted a custom mirror to cover the entire wall above
the sink. More specifically, we needed one because it required
cutting a hole out for an outlet on that wall. When I mentioned
that to a couple of companies, they just gave me excuses saying
it was very expensive and it could take a while to do. Finally
we found a place that didn’t complain and they did an
excellent job. They even supplied a mirrored plate cover without
me asking about it.
As one thing rolls into another, once the mirror was in, I
could finally fill the hole in the wall between the sink and
linen closet with a medicine cabinet. I prepped it before the
mirror was in by closing off the back side, shaping it to fit
a little better, spackling and painting it. It just took a
couple of minutes to screw in after that.
One last thing on
the second floor was to put back the air conditioner return
grill. We were debating for a while to get a new one because
the demo guys just ripped it off the ceiling. But that soon
changes when 1) I could find a new one that size and 2) repairs
to the old grill were simple. I bent it back to shape, screwed
it to the ceiling, put in a new filter (if only temporary...it’s
a cheap one) and done. Another thing that was so simple that
took me forever to finish.
Now back again to the basement where some baseboards needed
to put in. Normally you would install the baseboards before
the carpet, which I did for the second floor but I didn't have
time for the basement. This worked to my advantage because
I need to put in smaller baseboards on the footing on top of
the carpet (to help keep it down) so I did these all at once.
Since the carpet was in, the process just involved me painting
the pieces before I installed them. That way only some touchup
was needed...no need to tape the wall and floor. Once I cut
and painted the pieces, it still took a while for me to have
time to install them.
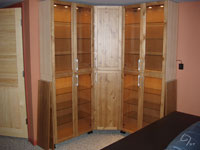
There’s one
last group of Ikea boxes that needed to be unpacked - the
game cabinet. In the back corner of the theater room, I wanted
to put in glass display shelves for all my old console game
systems that have been in storage for years. The problem
I was having with finding the right shelves was they were
too expensive (as most glass shelves are), which led me to
Ikea, but even there they were either too narrow (10”)
or too deep (16”). But I found the Goldilocks of shelves
in the form of kitchen wall cabinets. In our last place we
used top cabinets, which are 12” deep, for bottom cabinets
because it fit better. So I did the same thing here and found
the right style to go with the rest of the furniture down there.
The problem wasn’t the wood style, but the glass. You
see almost every cabinet style at Ikea has frosted glass...now
what’s the point in that. If you’re going to put
glass in, you should see through it. So there were only 2 styles
that had transparent glass and one of them worked with the
colors I picked. I was even able to maximize the space because
vertical height worked perfectly and since it’s in a
corner, I was able to get a corner cabinet to bridge the 2
sets of shelves and I keep all the games and accessories there.
 Just as in our last
place, I had to customize this by supporting the weight on
feet, as opposed to hanging it from a rail on the wall. I
did use the top holes meant for the rail to anchor it to
the wall. During construction I had an outlet put in this
corner near the ceiling for the cabinet lights. It was supposed
to be wired to a switch, but as I said in my rant back in
July, that didn’t happen. That’s OK...I
found a remote lamp switch that I strung to the side of the
cabinet. Now the lights that I installed in the cabinet can
be controlled with the same IR remote used for the main lights. Just as in our last
place, I had to customize this by supporting the weight on
feet, as opposed to hanging it from a rail on the wall. I
did use the top holes meant for the rail to anchor it to
the wall. During construction I had an outlet put in this
corner near the ceiling for the cabinet lights. It was supposed
to be wired to a switch, but as I said in my rant back in
July, that didn’t happen. That’s OK...I
found a remote lamp switch that I strung to the side of the
cabinet. Now the lights that I installed in the cabinet can
be controlled with the same IR remote used for the main lights.
January. Technically,
once the railing and mirror were up (really the plate covering
the outlet), we were ready for inspection. That happened
right before the holiday, so I waited until after to schedule
it. One more little thing, though. The initial plan of the
server room was to install a door after inspection so right
now the frame was open. To help the appearance I got a tension
pole and hung a curtain from it. Simple. Elegant. Its purpose
was only to hide the fact that it wasn’t finished.
In the mean time I had to build the DVD shelves.
In our last place
I used Elfa media shelves...the media part just means they
are 8” deep, as opposed to 12’ or
16”, which is what our closets are. They all are the
same style of brackets and standards. The tricky thing was
the wood style shelves didn’t match any of the wood I
have in the room and they were expensive. So the thing to do
was to make them. This allowed me to make a custom length (the
store bought ones are 30”) and stain color. Since I have
a lot of DVDs, I figured 48” shelves would work on the
walls on both sides of the screen, floor to ceiling. 8 per
side make 16 shelves. It was easy enough to find the wood,
cut them and drill the appropriate holes in them in order to
fit the brackets. No problem there, either. But the number
of them made this difficult, since I only had so much room
to lay them out for staining. I made room in the shop for 8
at a time...and it took forever for the stain to dry, even
after wiping the excess off. I was hoping this would take 2
days total for this and it took a week because of the dry time.
Then, quite proudly,
I unpacked all my DVD boxes and filled the shelves. For the
record, there were 13 banker boxes of them. All stacked up
near the window. Just like that scene from the Incredibles
when Helen calls Bob all excited to tell him they’re
finally unpacked (after living there for a while), that was
what I was feeling. I even called Alison to tell her the
news. She was just as unexcited as Bob was. To be fair, she
was busy to deal with me. Sure, there were a couple of little
things left to unpack, but that was the last big thing.
 
prev |1|2|3|4|5|6|7|8|9|
next
Back
to the News page |