September
3rd, 2006. The
REAL move in day. It was a gorgeous day. The storm cleared
the skies. The move went pretty smoothly. There was only minor
damage on one object...which unfortunately was on one of the
most important pieces. The couch that we originally wanted
upstairs in the master bedroom couldn't make it up the stairs,
so it went in the back of the living room which consequently
we are happy with. While the queen mattress made it upstairs,
the box spring didn't. We were told that you can just take
the fabric off, cut it in half, fold it over and staple the
fabric back on. I'll explain in a bit that it was a little
more complicated.
 The
miracle of the day was getting the previously mentioned green
couch in the basement. It required quite a bit of massaging,
but the movers finally did it. They tried bringing it outside
and through the basement door, but the frame was short by 3
inches. The only way down was by bringing it back inside and
taking the interior door off and squeezing it down. So it's
there to stay. The
miracle of the day was getting the previously mentioned green
couch in the basement. It required quite a bit of massaging,
but the movers finally did it. They tried bringing it outside
and through the basement door, but the frame was short by 3
inches. The only way down was by bringing it back inside and
taking the interior door off and squeezing it down. So it's
there to stay.
The movers basically put all the boxes in 3 locations - basement
(theater room), first floor and second floor. The first floor
was pretty much open game, but since the carpet wasn't down
yet, it wasn't a good idea to put anything in the hall or the
master suite, so that left the other 2 bedrooms. I had been
storing the closet shelves that we bought way back when in
the small bedroom, so I had to take them out to make room for
the movers only to move them back when the carpet was going
to be put in.
The lack of carpet on the second floor was a hindrance since
we couldn't put anything in the master bedroom and closet before
we did and now that all our stuff was there, we had a lot to
unpack. We couldn't wait for the tile work in the master bath
to be finished before the carpet installation. So that was
the next step, but we still had the rest of the weekend to
clear a few boxes.
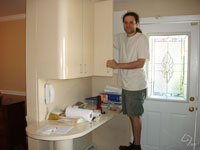 The first thing to be unpacked was the kitchen. It was the
best thing to do because, a) we need to eat, b) the room was
ready and c) it had the most amount of boxes involved. That
way a huge chunk of unpacking would get done just from this. The first thing to be unpacked was the kitchen. It was the
best thing to do because, a) we need to eat, b) the room was
ready and c) it had the most amount of boxes involved. That
way a huge chunk of unpacking would get done just from this.
In the interest
of saving a lot of money we decided not to redo the kitchen.
We were doing a lot as is, plus I redid the kitchen in our
last place so this time around we really wanted to do something
different...so it can wait. That being the case, the only
thing we had done was really add a baseboard heater (there
was never a heater there before) and since we are going to
redo the room eventually, I cut the floor so the fridge could
fit into the cabinet (it was a 1/4 inch too tall). The cabinet
door couldn't open before that. The other thing I did was
replace this tiny lazy susan in the corner cabinet with one
more suitable to the cabinet size (i.e. larger). We found
a nice one at Ikea. Then the corner cabinet door hinge broke.
It's a 150 degree hinge (as opposed to 90, which is what
most are), which is harder to find. So once again I go to
Ikea...I told customer service that they forgot to give me
that hinge in the kitchen set I just bought. They obliged.
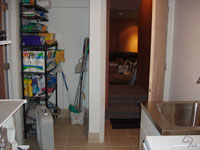 When
we eventually decide to redo the kitchen, we're also going
to want a place to put a second fridge. In fact we designed the
laundry room with that in mind. The plan on the room is to have
shelves on one side to store all the large kitchen stuff, and
have a space that is big enough to fit a fridge. For the record,
it's also just the right size to fit an arcade machine that
I have my eye on ;). Right now we just have a set of shelves
there for cleaning supplies. When
we eventually decide to redo the kitchen, we're also going
to want a place to put a second fridge. In fact we designed the
laundry room with that in mind. The plan on the room is to have
shelves on one side to store all the large kitchen stuff, and
have a space that is big enough to fit a fridge. For the record,
it's also just the right size to fit an arcade machine that
I have my eye on ;). Right now we just have a set of shelves
there for cleaning supplies.
There's also a utility sink in there
as well. The plumber was so impressed
with it, he couldn't believe it was Ikea. Sounds like a commercial,
I know, but he also told me how he installed a $10K utility
sink. That blew my mind.
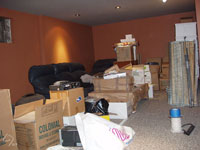
Actually, the only room in the house that we did absolutely
no work to (not even paint) was the sun room...at least not
yet. It actually worked out because this served as a staging
area for all of our stuff. All the tubs, toilets and sinks
lived in there for months before we could install them. Even
the cabinets that I purchased for the basement were there for
so long that the boxes were bleached by the sun. Even after
we finally moved in it was still a mess of stuff.
Once we were in, we set up shop in the medium guest bedroom.
There was already a bed in there and the working bathroom is
across the hall.
That week the carpet
guys came back to do the upstairs. Everything was straight
forward with this except I had to help to bring it up the
stairs around the same corner that the bed frame couldn't
make...it was tight. That means it took 3 guys to get this
carpet upstairs. Then I went on my way and the guys installed
carpet in the master bedroom and closet, and followed it
throughout the hallway and down the stairs. We once again
choose a berber type carpet, but this one was mostly beige
in color.
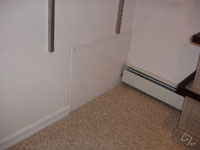 There were 2 spots
in the house where I needed to create access panels in the
walls. In the basement, in order to get to the plumbing stack
as it enters the slab, and in the master closet in order to
get to the jacuzzi motor. They were both simple enough to make.
I just cut some MDF to size, painted it the same trim color
as the rest of the respective rooms, and screwed it to the
studs. It's only in emergency that I would need to open them,
so the screws are easy enough to remove since they are exposed.
Added a small trim around it and done. There were 2 spots
in the house where I needed to create access panels in the
walls. In the basement, in order to get to the plumbing stack
as it enters the slab, and in the master closet in order to
get to the jacuzzi motor. They were both simple enough to make.
I just cut some MDF to size, painted it the same trim color
as the rest of the respective rooms, and screwed it to the
studs. It's only in emergency that I would need to open them,
so the screws are easy enough to remove since they are exposed.
Added a small trim around it and done.
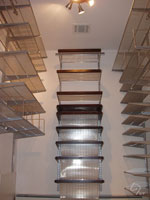 Once the carpet was
in, I began to put together the master closet. That meant finally
putting up the Elfa sheves that we bought the day after we closed
on the place. This stuff (made of metal, and a lot of it) was
shuffled around 3 or 4 times before finally getting put up...and
it was quite dusty. Finally the closet was ready. Once the carpet was
in, I began to put together the master closet. That meant finally
putting up the Elfa sheves that we bought the day after we closed
on the place. This stuff (made of metal, and a lot of it) was
shuffled around 3 or 4 times before finally getting put up...and
it was quite dusty. Finally the closet was ready.
In
order for the stone guys to finish the master bath without destroying
the new carpet,  I
had to protect the carpet by taping down plastic and paper to
the floor. What was left upstairs was the wall and the window
/ door frames. Once that was done, the last area was the first
floor bath and hallway, which is accessible from the front door. I
had to protect the carpet by taping down plastic and paper to
the floor. What was left upstairs was the wall and the window
/ door frames. Once that was done, the last area was the first
floor bath and hallway, which is accessible from the front door.
The granite floor in the bathroom continues into the front
hall but with a darker green and brown granite. Since we had
extra tiles and the closet had no floor we put in granite tile
in the closet as well. It's silly, but we had extra. Even the
stone guys got a chuckle from that.
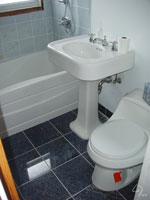
End
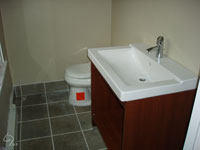
of September. After
all the tile was in we had the plumber come in to set
the toilet in the master bath and the toilet and sink first
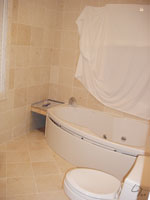
floor bath. I was a man with 3 thrones. At first, we had to
tape a sheet to the window in the master bath because
the window wasn't frosted, nor did we have a blind for
it.
In the master bath,
we had a custom limestone countertop put in. It's an "L" shape with one leg
made of the same 1.25" stone. Apparently the installer
never made something like that and even though I described
it perfectly, it didn't come out the way we planned. It's great,
none the less. On the other side of the room, we had a small
piece of the same stone put in on the side of the tub as a
little seat. As well as a saddle for under the door made of
the same stone. All that was left to make the room physically
useful was to hook the sink up, which the plumber did in no
time.
Now that the contracted
work was mostly done, the little things mostly fell on me...and
there were a lot of little things. One of the first things
I had to set up was my desk. I needed a spot to work in case
a paying job came in after all. The rest of the basement
was a mess, but the office was all set up, including the
shelves, in all of its Ikea glory. I used the same Galvant
L-shaped desk I bought for the last place, and hung Effictiv
cabinets above to match. Across from the desk was another
set of Efectiv cabinets floor to ceiling, but since they
didn't make the same color I had anymore, I got a darker
brown that worked just as good.
After a bit of research,
we found out that the whole "cutting
the box spring in half and bringing it upstairs" thing
only worked for extremely cheap ones, i.e. not ours. 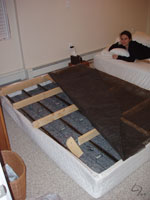 The idea
is you take the staples off the fabric and peel it back to
expose the inside. Then you cut the rib boards that run the
short length, fold it over (bending the wire that usually runs
around the top), bring it upstairs, fold it back and staple
the fabric back on. The bed frame and the fabric should hold
the thing together. But that didn't happen. Our frame had a
net of 1/4" steel wires running throughout, not top mention
3 steel beams running the length. Folding it was not happening.
After trying to bring it up again we saw that it was just 2
inches too wide to make it up to the first landing. Once up
it should be fine. The idea
is you take the staples off the fabric and peel it back to
expose the inside. Then you cut the rib boards that run the
short length, fold it over (bending the wire that usually runs
around the top), bring it upstairs, fold it back and staple
the fabric back on. The bed frame and the fabric should hold
the thing together. But that didn't happen. Our frame had a
net of 1/4" steel wires running throughout, not top mention
3 steel beams running the length. Folding it was not happening.
After trying to bring it up again we saw that it was just 2
inches too wide to make it up to the first landing. Once up
it should be fine.
So what I did was peeled back the fabric as I mentioned above,
and just cut one of the ribs...and made it up to the landing.
But then it wouldn't go up...it was stuck on the second rib,
which was a .5 inch too long. Then I just notched the wood
and the frame had the right angle to slide right up the stairs.
A quick repair on the rib (by screwing on a metal plate) and
stapling the fabric back on and it was good as new. When we
decide we are done with this bed, it will leave in pieces.
By this time we had to clean out the sun room. It was filed
with tools, spare parts and everything you could think of.
You could barely see the floor in this 17' x 9' room before
we cleaned it. We needed to make room because...
 
prev |1|2|3|4|5|6|7|8|9| next
Back
to the News page |