August. The final
sprint to move in day. The storage facility charges by the
month, so if we couldn't move in at the end of this month,
we have to pay for another whole month which we didn't want
to do. I arranged to have the movers come the first in September
without charging me another month. So it was settled. We had
one month to finish.
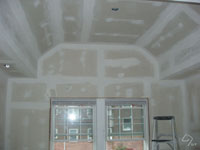
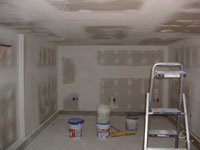 Clearly,
in order to close up the new walls, we had to sheetrock and
spackle them. There were some patches here and there on old
walls, like on the first floor where the old radiators were.
The work shop and the boiler room are the only rooms in the
basement where there are exposed walls and ceiling. For added
soundproofing, I had 2 layers of 1/2" sheetrock
put in the ceiling of the theater room. Ideally I should have
had a drop ceiling, but even though it's now a taller 7 foot
ceiling, it's still low. Drop ceilings take up several inches
at least, and every inch counts here. One is better than three
to four. Clearly,
in order to close up the new walls, we had to sheetrock and
spackle them. There were some patches here and there on old
walls, like on the first floor where the old radiators were.
The work shop and the boiler room are the only rooms in the
basement where there are exposed walls and ceiling. For added
soundproofing, I had 2 layers of 1/2" sheetrock
put in the ceiling of the theater room. Ideally I should have
had a drop ceiling, but even though it's now a taller 7 foot
ceiling, it's still low. Drop ceilings take up several inches
at least, and every inch counts here. One is better than three
to four.
At first, all 3
bathrooms walls were covered wonderboard, which is a really
thin layer of concrete. While green sheetrock is water resistant,
wonderboard is water proof. However, it doesn't have a smooth
surface, so unless you plan on putting tile on top of it,
it's not a good idea. Because of that we realized all the
walls didn't need to be covered in it. The sheeetrocking
crew (when they showed up) were busy doing other things,
so in the interest of finishing, I took off all the wonderboard
and installed greenboard where needed in the bathrooms. I've
still got most of the pieces in the garage.
So now the new areas needed doors - master suite, 1st floor
bathroom the whole basement. Six in all. I had help, but I
did get the new door and door frames up. The trim will be added
later.
When we realized it was too expensive to move the AC unit,
we decided to just move a couple of ducts around. One duct
needed to be in the wall before we closed it up, so that had
to get done in a hurry. Everything was a rush at this point.
The painters had to wait on that wall until it was finished.
 I tried to arrange each floor to be completely sheetrocked,
spackled and sanded so that the painter could start. Starting
with the second floor and working down. It worked for he most
part, but it turned out that the guys who originally did the
spackling didn't do quite a good job, so I had the painters
do it. Even still, while the painters were finishing up the
1st and 2nd floor, the basement was still being finished by
the other crew. I tried to arrange each floor to be completely sheetrocked,
spackled and sanded so that the painter could start. Starting
with the second floor and working down. It worked for he most
part, but it turned out that the guys who originally did the
spackling didn't do quite a good job, so I had the painters
do it. Even still, while the painters were finishing up the
1st and 2nd floor, the basement was still being finished by
the other crew.
The painters went crazy. Every single room in the house needed
to be painted. Keep in mind almost half of the walls were new.
Obviously, every room had a reason for each color, that being
something to match to. On the second floor, it started with
the stone tile we chose for the bathrooms. For the guest bath
(the small one) I really liked this royal blue granite and
since it's too dark for the walls around the tub, we found
a light blue granite to match.
The only problem
with that tile was there was a limited amount. At first,
the guy sold us tile that was 1 inch thick. Even I questioned
how that would work on the wall (it's really heavy), and
when the installer saw it he said no way. So we exchanged
it for their entire stock of 16" x 16" x 3/8" tile
of the same stone which was just enough in the end. We still
have one of the 1" tiles in the kitchen as a cutting board
/ hot plate.
So naturally we had the guest bathroom walls painted with
a cool (blue) white. For the master bath we chose a light,
sandy colored limestone and light cream color for the walls,
carrying that color into the bedroom. I wanted the bathroom
colors to contrast each other...one warm, one cool. The medium
guest bedroom, being across the hall from the guest bath, is
a light blue and the small bedroom is a light green to compliment
it.
On the first floor, we used a Japanese theme to choose the
bathroom color. We chose a light yellow-green granite tile
and a paint to match...kind of bamboo color. The previous owner
redid the tile around the fireplace and we went off that blue
color to find a blue-green color for the walls. As a total
coincidence, it's the same color that's in the Restoration
Hardware stores, so finding the right curtains was easy.
From the kitchen,
dining room and stairway we needed to find something that
worked with the wood furniture and the existing kitchen cabinets
(it's a kind of an open kitchen). In the dining room we also
used a darker color below the chair molding.
The previous owners sold us this great dark green couch set
that I wanted to use in the theater and we bought a new beige
set for the first floor that worked with our color theme. Between
the color of the couch and my existing desk, I found a nice
terra cotta color for the basement walls. Typically theater
ceilings are black (you want it to disappear), but with the
lower ceiling I went with a warm medium gray.
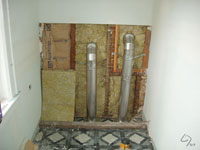 The
final step to hooking up the hot water heater and boiler
is to attach the side vent. Both the boiler and hot water
heater need to expel the gas from the combustion and normally
they are hooked up to the chimney and the gas just rises
out. However a side vent uses a fan in he unit and blows
the gas out the side (hence the "side" in the side
vent ;) ). The
final step to hooking up the hot water heater and boiler
is to attach the side vent. Both the boiler and hot water
heater need to expel the gas from the combustion and normally
they are hooked up to the chimney and the gas just rises
out. However a side vent uses a fan in he unit and blows
the gas out the side (hence the "side" in the side
vent ;) ). 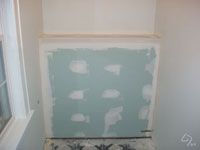 It's
much more efficient, but the only guideline is the exit has
to be 4 feet from any window. Normally that’s difficult,
but right above the boiler room is the new bathroom and right
outside that room is a bricked up window (based on the quality
of the brickwork, it was probably done by the same owner that
wired the lights ;) ). So the vents went through the 1st floor
bathroom and out the side. I built (yes, "I") a
box 1 x 4 feet on the exterior wall to over up the pipes and
filled it with fire proof insulation. This worked out nicely
because we now have a shelf for knick-knacks. Later, my father
built a wood shelf to put on top. It's
much more efficient, but the only guideline is the exit has
to be 4 feet from any window. Normally that’s difficult,
but right above the boiler room is the new bathroom and right
outside that room is a bricked up window (based on the quality
of the brickwork, it was probably done by the same owner that
wired the lights ;) ). So the vents went through the 1st floor
bathroom and out the side. I built (yes, "I") a
box 1 x 4 feet on the exterior wall to over up the pipes and
filled it with fire proof insulation. This worked out nicely
because we now have a shelf for knick-knacks. Later, my father
built a wood shelf to put on top.
The reason for the side vent was the chimney is about 6 feet
away from the boiler. If we were to hook up the boiler to the
existing vents, I would have to create a box along that wall
(outside the boiler room) to cover up the pipes, making that
wall useless. So in the interest of saving valuable basement
space, we used a side vent and went, interestingly, up.
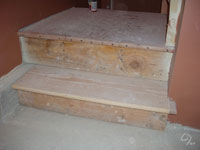
In order to accommodate
the fire code, we needed to cover up the back of the basement
stairs. We were about to do that and we discovered something
wrong with them. They were original (i.e. 77 years old) and
when you looked at them from underneath, the tread (what
you step on) was barely attached to the stringer (the side
pieces). So as a last minute decision, we had the stairs
replaced. It was a good thing too, because one hit with the
hammer and the tread came down.
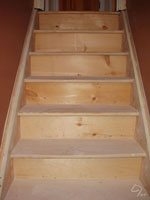
After the stairs
were installed, I installed a new tread and nose on the landing.
The nose (the piece of rounded wood along the edge) is really
just for aethetics for whn the carpet goes in. Since the
carpet is going to cover it, just screwing on a 1" nose
works fine. Then I added a molding on the top of the stringer
of the basment stair as well as removing and replacing the
small molding on the second floor stair. They were covered
in so many layers of paint, it was just easier to do it this
way.
End of August. With
the move in day approaching, we still didn't have a working
bathroom and the carpet wasn't down. The two things that
needed to be done so we could move in. Before that though,
we needed the stone floors to be put down. No floor, no
bathroom. No stone, no carpet because it's messy...the carpet
is the last thing to go in.
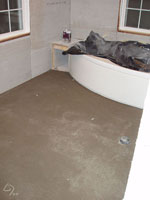 There are 4 areas where we were putting in stone floors (4.5
if you count the closet...more on that later) and 2 areas are
walls. In order of priority, 1) guest bath floor, 2) master
bath floor, 3) laundry room floor, 4) guest bath walls, 5)
master bath walls, and 4) front hall / bath floors. The floors
have a different priority than the walls because the fixtures
needed to be installed...plus those floors needed a mud (concrete)
layer to be put down on top of the radiant tubes. So that was
first. There are 4 areas where we were putting in stone floors (4.5
if you count the closet...more on that later) and 2 areas are
walls. In order of priority, 1) guest bath floor, 2) master
bath floor, 3) laundry room floor, 4) guest bath walls, 5)
master bath walls, and 4) front hall / bath floors. The floors
have a different priority than the walls because the fixtures
needed to be installed...plus those floors needed a mud (concrete)
layer to be put down on top of the radiant tubes. So that was
first.
The guest bath was relatively easy because the tiled area
was really only a 5 x 5 foot area. For the laundry room, we
choose a warm, creamy colored porcelain tile because of the
red color from the theater room next door. We choose porcelain
because it was really cheap...cheaper than putting linoleum
down (or original choice) considering the stone guys were already
going to be there. The laundry room was important to get done
because that was the only thing is the basement that was left
in order for the carpet to go in.
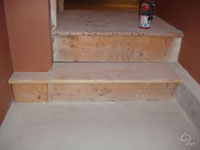
When the tile was put in, it was installed so perfectly; that
it revealed a flaw to the landing stair...it was crooked. This
I knew all along and when I installed the tread, I just matched
the stair, not the wall. Originally the small area between
the stair and the laundry room door was supposed to be carpet.
Its pattern would have hid that fact, but instead we continued
the tile into that space and the lines of the tiles really
made the step look wrong. So I had to remove the tread, and
offset it to match the floor. That made it much better.
Since it was ready,
the basement carpet was installed first. There was a happy
accident along the wall of the basement. For some reason,
a piece of the original floor was left in the corner. I thought
it was neat to see the original height of the floor. But,
in a brilliant move by the carpet installers, they chipped
away that piece after I told them to cut the carpet AROUND
it. Oh well. The carpet was installed on the stairs down
into the theater room. Only the boiler room, work shop and
under the stairs (server room / wiring closet) were left
with the exposed concrete slab. The carpet we choose was
a mud-colored berber type carpet with beige, dark green,
and dark red specks.
Now the basement is ready for stuff to be put everywhere.
September. A little overlap of stone and
carpet. The last week until move in day was maddening. I really
wanted the tile and the carpet to be finished but that wasn't
happening. The stone guys were able to finish the floor of
the master bath. It was installed so the grid pattern was offset
by 45 degrees so as to differentiate itself from the walls
which were going to be the same stone. There were several delays
in getting the stone guys to come back and that delayed the
carpet for upstairs. But I couldn't stop the movers from coming.
The good news was the plumbers hooked up everything in the
gust bath so we had a working bathroom. We were ready to move.
September
2th, 2006. Move in day. Everything
was set for the truck to come. We had to not only deliver the
stuff we had in storage, but pick up and drop off a couple
of things at my parents house and drop off a couch at a friends
house on the same block. It was Labor Day weekend and with
a Saturday move, we would have 2 days for initial unpacking.
8 months working up to this point...and it wasn't going to
happen. There was a huge storm forecast for that day and the
movers really recommend against that day. Ordinarily, they
don't move on Sunday, but they made an exception in this case.
So...
 
prev |1|2|3|4|5|6|7|8|9| next
Back
to the News page |