January 31, 2006. We close. The house is now officially ours. That weekend was
the last day of the Elfa shelving sale at the Container Store,
so we bought our master bedroom closet shelves. The closet
wasn’t even built yet, we just knew the approximate size.
I was well aware
of how much effort it was to lower the floor, and for a while
I debated weather or not to do it. But then I visited a post
house I work with (and where several of my friends from the
Tapehouse days ended up) and I was shown how they lowered
the basement floor for their sound room...and that convinced
me.
The process is as follows - 1) break the concrete slab (floor)
and remove all the concrete, 2) now that the ground is exposed,
dig down and remove the dirt and 3) add new stone and concrete
for a new slab. Sounds simple, right? Well, you can't dig any
deeper than the footing unless you underpin and that's a time
consuming, added expense.
Let me explain. Think of the footing as a big concrete shoe
under the exterior walls. So they are thicker than the walls.
If you dig below that, the wall looses its integrity...no good.
So you can underpin it, which is extending the footing down
[with the same thickness] by digging out and filling in sections
3 to 4 feet at a time. Time consuming. I knew of a house that
underpinned 8 feet down. The footing was 3 feet thick. 3 times
8 times the exterior dimension of the house...imagine how much
concrete was used. We didn't want to go through that, so we
decided to dig down the bottom of the footing. Typically, the
slab, about 8 - 10 inches, rests on top of the footing, which
is about 12 inches. If we did this, we could get the height
I need...7 feet would be nice.
March. Around this point, we were still camping
out at the house on the weekends, as we called it. We had heat,
hot water and 2 working showers. We just borrowed a futon and
crashed on the floor upstairs.
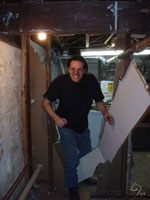 Before we had the
guys take the floor apart, my father and I demoed the basement
walls. Sure, we could have had them do it, but demo-ing is
fun. Get your aggression out. It also gave me the opportunity
to have my Big Jim Slade moment...I crashed through on of
the walls. If you were ever wondering
where my email address comes from, this is it. I also wanted
to dress up in a big stuffed red outfit and crash through another
wall carrying a jug of juice and scream, "Oh, yeah!"...but
Kool-Aid man just couldn't be. I didn't have time to get the
outfit. Before we had the
guys take the floor apart, my father and I demoed the basement
walls. Sure, we could have had them do it, but demo-ing is
fun. Get your aggression out. It also gave me the opportunity
to have my Big Jim Slade moment...I crashed through on of
the walls. If you were ever wondering
where my email address comes from, this is it. I also wanted
to dress up in a big stuffed red outfit and crash through another
wall carrying a jug of juice and scream, "Oh, yeah!"...but
Kool-Aid man just couldn't be. I didn't have time to get the
outfit.
We had to take part as much as possible before the
real demo crew came in. Even at that time I knew they would
destroy everything so anything I wanted to take care of, like
the boiler, I needed to do myself.
This was the point of no return. Once the water tank and boiler
were removed, no amenities. No more camping.
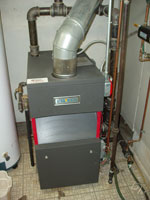 As for the boiler, there was nothing wrong with it... in fact
it was only 2 years old. We had just decided (or rather, convinced)
to change from a steam to a hot water system. Why? Well, among
other things, a steam system needs return pipes which, in order
to drain, are placed at lower and lower locations in the basement.
One even ran in the middle of the unfinished space at my head
level (yes, I hit my head several times before I removed it).
So there were 2-3 inch iron pipes running visibly throughout
the basement. Hot water pipes are hidden in the ceiling with
no return pipes. As it turns out, the pipes aren't even copper
anymore. They are high pressure PVC. Plus, as with many things
we did, if we wanted to do it, now was the time As for the boiler, there was nothing wrong with it... in fact
it was only 2 years old. We had just decided (or rather, convinced)
to change from a steam to a hot water system. Why? Well, among
other things, a steam system needs return pipes which, in order
to drain, are placed at lower and lower locations in the basement.
One even ran in the middle of the unfinished space at my head
level (yes, I hit my head several times before I removed it).
So there were 2-3 inch iron pipes running visibly throughout
the basement. Hot water pipes are hidden in the ceiling with
no return pipes. As it turns out, the pipes aren't even copper
anymore. They are high pressure PVC. Plus, as with many things
we did, if we wanted to do it, now was the time
.
It's amazing what you can find in the walls of a 76 year old
house. Downstairs I found a bucket filled with rubble under
the boiler exhaust pipes. It's a good bucket. I still use it.
We also found the insulation-that-shall-not-be-named surrounding
several of the steam pipes. Good thing we were loosing all
of that. For the record, we disposed of it properly.
The first day the demo guys came over they had to remove the
wood pile my father and I created in the basement and start
tearing apart the second floor. They did this all by 11 AM
(starting at 8) that day. They really tore the place apart
upstairs.
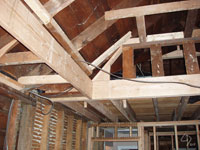
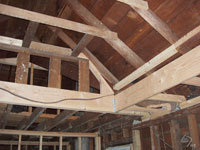
 It
was good that we tore down the walls and ceiling in there
because we discovered a major flaw to work that has been done
there in the past. It turns out that long ago a wall was removed
in order to expand the bedroom slightly...it was a load bearing
wall. When we took down the ceiling we discovered the joists
(the wooden support beams) were scissored and on the verge
of collapse. It
was good that we tore down the walls and ceiling in there
because we discovered a major flaw to work that has been done
there in the past. It turns out that long ago a wall was removed
in order to expand the bedroom slightly...it was a load bearing
wall. When we took down the ceiling we discovered the joists
(the wooden support beams) were scissored and on the verge
of collapse.
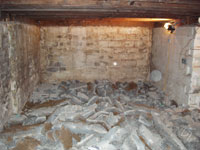 Back in the basement, when the guys came to remove the slab,
they found out that some areas it were 11 inched thick, but
the footing was exposed in other locations, so the slab wasn't
entirely resting on the footing. They broke it up by hand and
with a jackhammer...I came home one day and there was a pile
of rubble in the basement...and brought it out one piece at
a time through the basement door. But that wasn't the hard
part. Back in the basement, when the guys came to remove the slab,
they found out that some areas it were 11 inched thick, but
the footing was exposed in other locations, so the slab wasn't
entirely resting on the footing. They broke it up by hand and
with a jackhammer...I came home one day and there was a pile
of rubble in the basement...and brought it out one piece at
a time through the basement door. But that wasn't the hard
part.
April. Usually it's easy to dig the dirt
out, but unbeknownst to anyone, this area has a lot of rocks
and boulders in the soil. Right under the slab on the right
side was a gigantic boulder. But I watched the guys break that
thing up by hand and carry it away. As a memento, we kept several
several of the rocks that were under the house to put in the
[future] garden. Only one was heavy enough that 2 people were
needed to carry it.
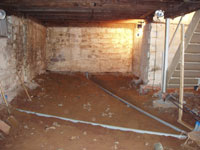
The next step was
to dig a trench so the plumber can lie in a new pipe for
the laundry drain since we removed the old iron one. We also
had the guys dig a hole in the back corner (where the boiler
room will be) for a dry well. A dry well is just a place
for water to collect and sink naturally into the ground.
In this case, the storm drain from the outside stairs is
fed into this 3 foot deep plastic bucket with holes in it
so the water has a place to go. After that a layer of gravel
should have been put down. However, because of ridiculous
delays (which I won't go into here), it was several weeks
before that happened. Since the basement was open to the
ground, it was open to moisture. So the entire exposed ceiling
became covered in mold...which I had to bleach away some
time later...that was a fun two days let me tell you. I had
to wear a full body painter’s
suit, goggles and a good respirator. I felt like I was checking
for radiation, and I still had to take a break every 10 minutes.
 End of May. But
I did take advantage to the delay. In the beginning, I wasn't
sure what type of set up I wanted for the home theater. I
still didn't at this time, but what I did final decide was
I wanted to centralize the components (amp, DVD player, etc.)
under the stairs, away from where the TV was to be located.
Since the shortest distance between A and B is a straight
line, the best way to run the cables from the stairs to the
front of the room is to run a conduit in the ground. So I
dug 2 trenches and laid in 2 inch PVC electrical conduit...one
going to the front of the room and the other going to the
left side of the room...the use of which I’ll explain
later. End of May. But
I did take advantage to the delay. In the beginning, I wasn't
sure what type of set up I wanted for the home theater. I
still didn't at this time, but what I did final decide was
I wanted to centralize the components (amp, DVD player, etc.)
under the stairs, away from where the TV was to be located.
Since the shortest distance between A and B is a straight
line, the best way to run the cables from the stairs to the
front of the room is to run a conduit in the ground. So I
dug 2 trenches and laid in 2 inch PVC electrical conduit...one
going to the front of the room and the other going to the
left side of the room...the use of which I’ll explain
later.
Upstairs, the framing in the master suite got done. In order
to create the vaulted ceiling, we slid the ceiling joists down
(the ones that were subject to collapse) to the new supporting
closet wall and had the weight of the roof redistributed to
the main bearing walls.
At this time we were about to close on the sale of our condo,
so our efforts were shifted toward that end. We spent our 2
year anniversary moving.
 
prev |1|2|3|4|5|6|7|8|9| next
Back
to the News page |