Hi all -
Last night, for
the first time in 3.5 weeks...I shut my computers down. The
hum of the fans was not present at 1 AM when I went to sleep.
Both of the computers (a dual proc desktop and a laptop) have
been rendering constantly 24/7...save the few hours during
the day to prepare more scenes. All to complete Pen vs Pencil.
It's a short film I've been working on for a while
now. 19 months, actually...well, it was one of those spare
time gigs and it probably took 6-8 months but spread out
over 19. Sometimes I would have the time to work 16 hour
days on it and sometimes I would go a while (up to 6 months)
without touching it. I actually finished the animation
back in July but between fixing up the new place and work, I couldn't
even look at it until a month ago.
If you want to see
it, click here. Otherwise
read on and I'll tell you a little about it. It's a little
long winded, so maybe you want to let it download in a new
window while you read ;)
The Idea.
In
July 2003, I was finishing up the Worm project and was
thinking of something new to do. Then
I went to Siggraph and was blown away by the Electronic
and Animation Theater. It had the most inspiring
collection of shorts I've ever seen...and was just
what I needed. So I bought all the DVD's from the show and
watched them when I got back. So when I asked myself what
I thought made one short better than the other, I came up
with 3 things. The first being quality (obviously), the second
being funny (ironically, the REALLY good ones are serious)
and the third being it's namesake: short. I found that no
matter how good something looked, after 3 minutes, I started
looking at my watch and wanted to move on. So, short and
sweet was the key...at least for this project.
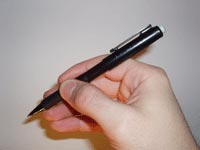 So
how about a commercial? At 30 - 60 sec, that would be perfect...so
I'm sitting there spinning my mechanical pencil and trying
to think of an ordinary, everyday product...wait...a pencil! That's it.
Somehow I thought of a story where the evil
Sharpies have captured a No 2 pencil and
decided to put it to death by sharpener. So then the mechanical
pencil comes in and saves the day. Simple. Short. Sweet.
So sweet in fact that I instantly thought of several ideas
for this scenario so it can easily be a series. Originally,
I thought it would be a great commercial for Sanford (makers
of Sharpies and a host of writing implements), but nixed
that idea very early because I realized that if I wanted
to submit this to festivals, I couldn't use their name. Which
brings us to the next point. So
how about a commercial? At 30 - 60 sec, that would be perfect...so
I'm sitting there spinning my mechanical pencil and trying
to think of an ordinary, everyday product...wait...a pencil! That's it.
Somehow I thought of a story where the evil
Sharpies have captured a No 2 pencil and
decided to put it to death by sharpener. So then the mechanical
pencil comes in and saves the day. Simple. Short. Sweet.
So sweet in fact that I instantly thought of several ideas
for this scenario so it can easily be a series. Originally,
I thought it would be a great commercial for Sanford (makers
of Sharpies and a host of writing implements), but nixed
that idea very early because I realized that if I wanted
to submit this to festivals, I couldn't use their name. Which
brings us to the next point.
The Goal.
Simply put, this was going to be a festival piece. I wanted to take
what I did in the Worm and take it to the next level. Technologically,
this time around I wanted to use sound, lipsynch, textures
and lighting. I wanted the characters to be bipedal,
and have more distinct personalities. I wanted to submit
this piece (and hopefully get in) to Siggraph.
Honestly though,
festival aside, this was an excuse to learn and experiment. One of
the reasons this took so long to make was because I purposely
caused problems in many areas just so I can figure out
workarounds. I tried anything and everything just to learn
new ways of doing things. Storyboard.
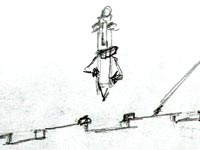 After
deciding which idea to focus on, I drew up a [rather crude]
storyboard. At the time I had a rather general idea of camera
angles and setups, so I drew them as best I thought out.
Really the point at this stage was 2 fold - 1) write out
the dialogue in reference to the action and 2) rough out
the set ups so I can use them for the animatic (essentially
a rough cut with storyboard panels.) Normally the former
is written in script form before
any panels are drawn, but it was all in my head, so I wanted
to kill 2 birds with one stone. It was also at this stage
where I designed the characters (as simple as they may be).
So now we're up to 3 birds. After
deciding which idea to focus on, I drew up a [rather crude]
storyboard. At the time I had a rather general idea of camera
angles and setups, so I drew them as best I thought out.
Really the point at this stage was 2 fold - 1) write out
the dialogue in reference to the action and 2) rough out
the set ups so I can use them for the animatic (essentially
a rough cut with storyboard panels.) Normally the former
is written in script form before
any panels are drawn, but it was all in my head, so I wanted
to kill 2 birds with one stone. It was also at this stage
where I designed the characters (as simple as they may be).
So now we're up to 3 birds.
Animatic
I
scanned the panels in and recorded a scratch track for the audio. I knew since
day one that I'd be doing the voices, so I just winged it
at first just to have something to work with. Adding audio
opened up a whole can of worms because I knew that without
a good recording, I'm done...and my little laptop, as good
as it is, wasn't going to cut it for high quality audio recording.
In the end, I borrowed a portable DAT player and mic and
recorded in my very own sound booth (closet).
The
panels were but together in After Effects and held to get an idea of
the pacing. This was good enough for me to use during layout.
But I can't layout anything if there's nothing there.
Modeling
and Rigging.
 I
spent a lot of time here. The characters were simply designed...pens
with eyes and paperclip arms, hands and feet. So you would
think the modeling was relatively easy...and it was for
the most part. But there were a lot of them. The story
asked for 11 characters (9 models). I modeled all
the characters using NURBS because I thought it would be
easier to model the detail. Plus I like using
lofts. The cardboard castle was sometimes harder to model
than the characters. Between the folds and the corrugation,
I think I did an OK job. The castle is a mix of NURBS and
polygons. I
spent a lot of time here. The characters were simply designed...pens
with eyes and paperclip arms, hands and feet. So you would
think the modeling was relatively easy...and it was for
the most part. But there were a lot of them. The story
asked for 11 characters (9 models). I modeled all
the characters using NURBS because I thought it would be
easier to model the detail. Plus I like using
lofts. The cardboard castle was sometimes harder to model
than the characters. Between the folds and the corrugation,
I think I did an OK job. The castle is a mix of NURBS and
polygons.
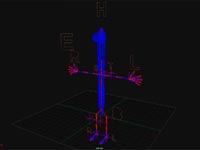
I
really wanted a lot of control when it came to animating
the characters...that
means trying to anticipate what the character will do
and put a control in for it. This is known as rigging.
An animated character is only as good as the rig it was
built on. It wont move that way if you don't let it. I
tell you, I have a lot of respect for the riggers at Pixar.
If you think they have good animators, the have
amazing riggers. Each of my characters has over 120 controls...4
times the amount of any of the Worm characters. There were
as many controls in one hand of the P vs P characters than
the entire Worm. So for me, this was a significant increase.
For the record, this is nothing compared to Pixars stuff.
I believe there was something in the order of 150 controls
for Woody's face alone.
To
further help the cause, I designed the rig as reusable.
So I applied the same rig to all the characters and adjusted
accordingly. My effort paid off when I cranked through
the animation stage
because of a well designed rig. Layout.
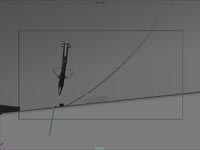
Now
that I had the virtual world and characters made, I could
film it. The layout stage is taking the camera and blocking
all the shots according to the storyboards. Now, since my
boards weren't the most accurate (they really didn't need
to be...I'm only communicating to myself) the shots REALLY
changed here. I came up with new ideas based on what the
camera showed. So now I had a new animatic made from the
3D geometry of in Maya. Just the characters in neutral position
(arms out). Besides the look, now I had all the Maya
scenes made with all the objects and characters needed in each scene.
This made breaking up the animation work easier.
Animation.
 The
fun stage. At this point it was the end of January last
year and the Siggraph '04 deadline was March 5th and I wanted
to try and make it (looking back, I don't know what I was
thinking). The first thing I did was to just do the key poses
for each scene. That way I can see how each scene worked
before I spent the mad hours tweeking the keys and inbetweens.
Not to mention it helped break the work down a little and
soften the overwhelming amount of work I had ahead of me. The
fun stage. At this point it was the end of January last
year and the Siggraph '04 deadline was March 5th and I wanted
to try and make it (looking back, I don't know what I was
thinking). The first thing I did was to just do the key poses
for each scene. That way I can see how each scene worked
before I spent the mad hours tweeking the keys and inbetweens.
Not to mention it helped break the work down a little and
soften the overwhelming amount of work I had ahead of me.
Remember
I said there were 11 characters? I wanted each one to be
completely different, otherwise, what's the point? The way
I came up with each characters personalities was a simple
3 adjective description - X and Y with a hint of Z. Then
a known character to think of. For example, the Mechanical
Pencil is confident and brave with a hint
of vanity...think of Robin Hood. It wasn't until I came up
with the "with a hint of" part when the characters really
came out.
Slowly
but steadily, I was bringing it to life. In fact, it was
coming out so well, by mid February I realized
that I didn't want to rush things just to make the deadline
so I decided to do finish the animation and not worry about
time (an advantage of working on a personal
project...I can make these
decisions). So while I did finish by the end of the month,
if I did want to make the deadline, it left me with no time
for the remaining 2 stages. Good thing I decided not to...I
didn't exactly finish. I
was merely at a point where I can request a little feedback
from some friends...and run in a much lower gear. Things were
getting busy in the paying work front, plus I a wedding to
plan.
The feedback required
me to make a few minor...and a few major changes. I
almost completely re-edited it, breaking up longer camera
move scenes
into smaller lock off shots. Some new animation was created
at this point, but the majority of the fixes just required
a repositioning of the camera. That's what's wonderful about
3D animation...I can move the camera after the animation
is done. By the time I "officially" finished the animation
was the end of July...just before I went to Siggraph. Shading and Lighting.
OK.
It's February and the Siggraph '05 deadline is the goal
now: March 11th. It's this year or none. After putting
together the web site, I'm ready to go. Technically, 95% of the textures and
shading was done way back in the modeling stage, but
it's that last bit that makes a difference. It's the
checkbox that says, "raytrace reflections" that makes
the arms look like shiny paper clips. Oh, but I wish
it was that simple. Being that this is a learning and
experimenting project, I tried all sorts of stuff...even
how I should render. Maya basically has 2 ways to render
this: software (of which I'm familiar) and Mental Ray
(of which I never used). Let's just say that I would
have loved to use Mental Ray (what I learned was to use
it next time perhaps), but there were so many little
things that needed to be set...I really had a deadline
now and didn't have time (or the interest) to re-shade
everything. So Maya Software it was...with raytraced
shadows. But I need lights.
The
lighting is just 3 point lighting. Hey, the system works.
But I did read tip in a book a few weeks before about
the color temperature of lights that I never thought
of. I gave the key light (representing the sun) a slightly
warm tone to it and had it cast cool shadows. The fill
light had a slightly cool tone to it. What a difference.
It really
set the mood I wanted. The shadows...*sigh*...there are
3 types a shadows: depth mapped (soft, generally fast
to render), raytraced (hard, slower to render), and soft
raytraced (hard to soft, what real shadows look like...but
VERY slow to render). I had to use raytraced. Because
of the size of some of the objects and their proximity
to each other, depth mapped shadows gave me errors. But
I hate the look of sharp raytraced shadows...it looks
really CG to me. Soft raytraced it is...and it
literally renders 10x slower. But there's that deadline.
There's also chance. Siggraph allows the submission to
be at least 80% done, so I decided to
render sharp raytraced for the submission and if accepted,
I can resubmit the finished product.
Render,
Sound and Composite.
 Once
I decided how I wanted everything, I just hit go and hope
for the best. To save time, I rendered as layers and composited
it together in AE. The castle renders much slower than the
characters, an most of the shots are lock off, so only
one is needed. But there are complications with Maya. Apparently,
when rendering
2D
motion blur, it
eats
away and
alias' all the images edges. When rendering 3D motion
blur, it doesn't
calculate the reflections properly. I tried every setting
I could find...nothing. Perhaps Mental Ray wouldn't give
me this problem. So what I did...and I would never do this
in a time sensitive production...is render both motion blurs
and comp them. 3D blur for the edges and 2D blur for the
center. The renders took anywhere from seconds (mouth levels)
to up to 2 hours per frame (3D motion blur + Soft raytaced
shadows = evil combination). The majority was between 10
and 20 minutes per frame (keep in mind that's one LEVEL,
or render pass, not the entire comped frame). Once
I decided how I wanted everything, I just hit go and hope
for the best. To save time, I rendered as layers and composited
it together in AE. The castle renders much slower than the
characters, an most of the shots are lock off, so only
one is needed. But there are complications with Maya. Apparently,
when rendering
2D
motion blur, it
eats
away and
alias' all the images edges. When rendering 3D motion
blur, it doesn't
calculate the reflections properly. I tried every setting
I could find...nothing. Perhaps Mental Ray wouldn't give
me this problem. So what I did...and I would never do this
in a time sensitive production...is render both motion blurs
and comp them. 3D blur for the edges and 2D blur for the
center. The renders took anywhere from seconds (mouth levels)
to up to 2 hours per frame (3D motion blur + Soft raytaced
shadows = evil combination). The majority was between 10
and 20 minutes per frame (keep in mind that's one LEVEL,
or render pass, not the entire comped frame).
What
about sound? Back in August I met up with a neighbor of
mine, David Musial (who has a sound studio in his place),
about recording some foley effects. He agreed and after seeing
a replay, ended up liking my film so much he wanted to
put together
a score and do a great
job. How could I refuse. We finally got together last month
and put it together. Since day one, I had an idea
of what I wanted for the opening and credits, in fact it
was in an early version of the scratch track. But I couldn't
use Metallica for any festival, so I needed to write something.
So I dusted off the old guitar and came up with a few cord
progressions and David and I (mostly David, really), scored
the main piece. We used the foley we recorded back
in August, added some new stuff, layered it all together
and we were done.
The
character design required a minimal comp. Because they were
all sticks, the mouths wouldn't have any depth. So I created
another level of mesh for the mouths and rendered it separately
with a green exterior...keyed off the green and comped it
in. Since everything was in layers, it was easier to do little
tweeks of color and blur. Adding focal depth or adjustments
in the gamma to help separate the characters from the background
was instrumental. Even a little glow to make it look dreamy.
By the way, the sky could have easily been just a gradient,
but it's not. It's a photograph I took several weeks ago
of a crystal clear day while skiing at the top of Killington
mountain.
So
that's it. I made the March 11th deadline. On Wednesday last
week I sent the DVD, and I sat for a few moments before
getting back to work while the computer
was still rendering. It did not have that luxury. It got
it's chance this past Wednesday. Now, I have only to wait
to see if I got in. No
matter how you look
at
it,
the
goal was accomplished, and it came out better then I could
have imagined. Hope you like it.
Enjoy...
- Luciano
Back
to the News page |